Thursday, March 13, 2014

DIY Tinted Lip Balm


Hey all! I think I mentioned that I would do a tutorial on DIY tinted lip balm, so here it is! Thankfully I took pictures before I left for Spring Break. I just had to edit the pictures (i.e. crop, haha) and add my commentary before uploading them! Yay!

I was inspired to make my own tinted lip balm because spring is right around the corner, and I'm feeling like sheer color is what I'm going to want to do. Also, I saw that Vaseline has a red tinted tub of stuff, and I thought, "Hey I could make something like that." So I did.

So here's what you need:


The basic idea is: Base, Color, Case. Take a lip balm or some other similar base, sprinkle in some color, mix it together, and put it in a case. Easy peasy. In the first picture, I showed the three I've already made. All three had the rose salve as their base, and their color comes from (from left to right) Maybelline Color Whisper in Berry Ready; a combination of Milani Color Sensation lipstick in Nude Crème and NYC lipstick in Petal; and Hard Candy Baked Blush in Doll Face.

You're probably thinking, "Stacie, that doesn't look like the Hard Candy blush I know as Doll Face." Well, that's because I broke it years ago and had to put it in another container. And that actually made it a lot easier to use in this process. Take a look:


So let's take a deeper look at what we'll need:

Base


As you can see, I've already dug into the rose salve. Both of these are petrolatum-based, so they're very thick and moisturizing. They also give off a very glossy look, which I like. As another plus, they're fairly malleable, so it's easy to mix them with the color. Other, more solid lip balms might not have such a great end result.

Color


Color can be anything: lipstick, blush, or eye shadow. If you use a lipstick, you'll require less product. Using a blush or eye shadow takes more to get anything to show up. A loose powder blush or eye shadow pigment is the easiest way to utilize dry pigment into the base.

Case


And of course you need something to put your concoction in. I heard a while ago about melting down lipsticks and/or combining lipsticks to make your own colors and that small pill organizers were good for this purpose. I've had this for a while, and a couple of the slots were already occupied with lipsticks I had melted down. Thankfully, I had a few slots left when I decided to try out my idea. In this picture, though, there's only one measly spot left. I better make this count! I think I've also seen little pots that you could fill with the lip balm as well, maybe at a craft store or something like that.


Oh, and let's not forget a stirring utensil! In true college girl fashion, I have a plastic-wrapped knife at the ready. It's actually a pretty useful tool for this process.

Make it:


First up, get the base ready. In my case, I just put the base in the case, but you could combine the ingredients in a separate container and then put it in the case when everything is evenly mixed. That actually would have made things a lot easier and cleaner, in retrospect. I recommend it. As you can see, the rose salve has a tint to it, but it doesn't show up at all on the lips--it might as well be clear.


For this walk-through I wanted to show what to do with a solid product. If the color that you want isn't in a conveniently crushed or powder form like the baked blush or the CoverGirl TruBlend Minerals blush I had in the picture, then you'll have to scrape whatever you want to use.

The knife I had was actually pretty useful for scraping. The non-cutting end was pretty smooth and had a slight ledge that really worked to loose the product. I wouldn't recommend using the serrated part of the knife, since it will leave ugly scrape marks in the product, and bits of the blush/eye shadow will be stuck in the teeth and wasted.

Now it's time to sprinkle the product in and mix it up. Unfortunately, I don't have a photo, but as I alluded to earlier, this was a bit of a messy process, so I was quite involved in it and didn't think to stop and take a picture. I'm sure you can figure it out.


So there you go. Just a fun way to make your own tinted lip balm. It's a really great way to use lipsticks that are too matte for you, but you still like the color, or a blush that you think would work really well as a lip product. Yay, Multi-purpose products! And those balms that I pictured just leave my lips so hydrated and glossy, I love it. I'm going to have to do this for the rest of my life, now, I think.

I hope that you have a lovely day, and that you have safe travels if you're traveling :)


~Stacie 

Friday, March 7, 2014

Petal Pusher Challenge, Day 5: Flapper Girl


Whew, I did it! I didn't know if I'd actually be able to do all 5 days in a row, but I did! So exciting. Here's the last day, and it's one of my favorite looks to do ever: Flapper. Flappers were so fearless with their makeup, and they inspire me! Once again, I forgot to take a both-eyes shot, but I did remember to take a picture of my face makeup products! Here's the other stuff:


If you need a reminder of the key elements to a Flapper look, check out my post here. I was a Flapper Girl for Halloween, so I talked about my makeup in that post.

And that about wraps things up! I've really become appreciative of all the looks the palette can produce (and there's more than just what I did), but I'm definitely ready to be able to use my other makeup! I feel like I've been neglecting it, haha! I'm about to head off on my Spring Break adventure, so I'm excited for that :) If you're also about to have your Spring Break--be safe! And everyone else, too :)

♥Stacie♥

Thursday, March 6, 2014

Petal Pusher Challenge, Day 4: Sweet Smoke


Hey everyone! It's Day 4 here with another look. I failed pretty miserably and didn't take a picture of both eyes open and closed, nor a picture of all the other products I used. Sorry! I don't know what was up with that. I think I must have been in a hurry. Anyway, here's the rest of the stuff you've come to expect.


Have a lovely day, and I'll talk to you soon! Spring Break is just around the corner, and boy do I need it!
~Stacie

Wednesday, March 5, 2014

Petal Pusher Challenge, Day 3: Purple Smoke


Okay, y'all. This is going to be a pretty short post, word-wise, anyway. I'm pretty tired, so I'm just going to put the images up. I think you get the gist of things by now anyway. You don't need my babble.


And that's it! I hope you all had a great day! Goodnight!
~Stacie

Tuesday, March 4, 2014

Petal Pusher Challenge, Day 2: Whisper of Lilac


Hey all! It's Day 2 of the PPC, and I'm back with another look! Also, I can't figure out why my face looks so round in that picture. In all the angles I shot, my face looked really round. Maybe it's because of my hair. Anyway, moving on!

This look was me using this palette to do a look I'm looking forward to doing a lot this spring: subtle eye shadow, lots of lashes, and lots of blush! I was inspired by this photo in a promotion for Everyday Minerals:


The focus for her was blush, and I thought it was just gorgeous! It's more liberally applied than a lot of the gurus tell us to apply blush, and not so angular. It actually simulates more of a natural flush. I thought that thick lashes would add to the innocent look, and a subtle swipe of color would add something a little extra. I did a similar look this past Saturday with a light green shade and LOVED it. I thought lilac/lavender would be good, too. Pastels are usually associated with spring, anyway :)

The shadows I used in the look


Hey, it's another GIF! I can't help myself. I'm such a nerd.


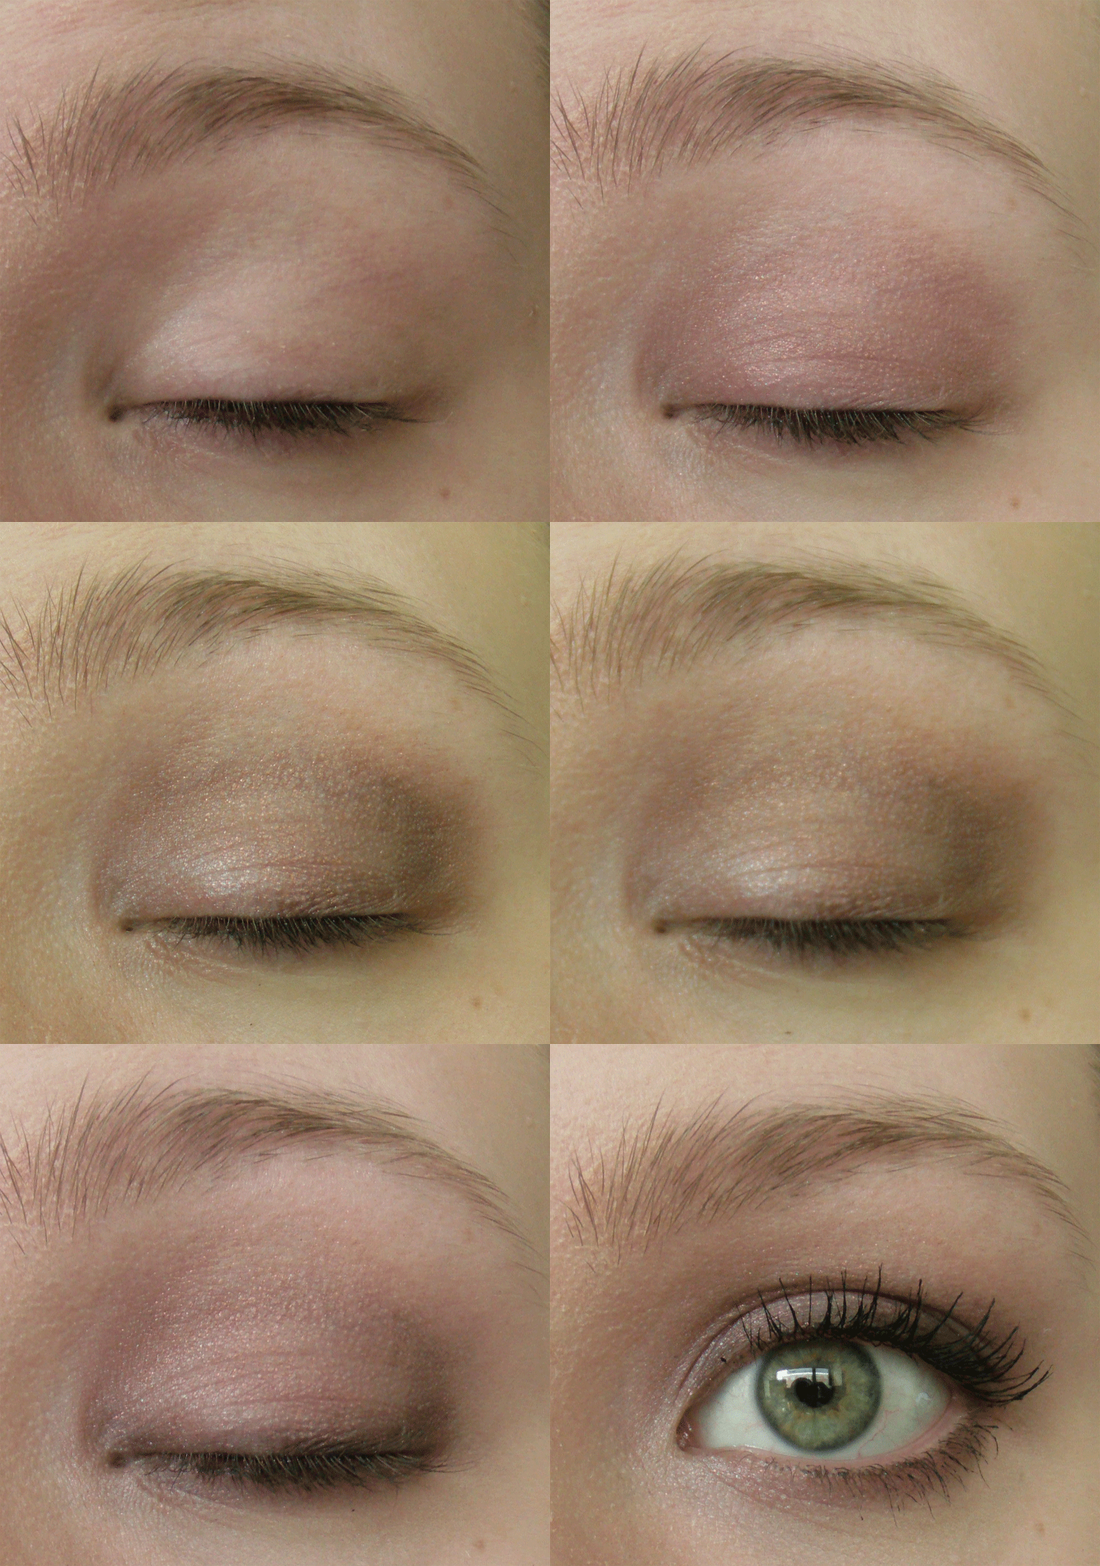
And now for the step-by-step.


The moral of this tutorial is that I need a better camera for taking pictures! The color never shows up as vibrant as it really is :( Also, I forgot to mention it, but curl your lashes before applying mascara--it makes them even fuller looking!


So, do you get the feeling that this look was blush-heavy? Half those products are cheek-related. I had to keep adding blush, though, because it wasn't showing up in the picture. I eventually gave up. I still have to look semi-normal for my everyday things.

Well that wraps up Day 2! I hope you have a love day, and I'll talk to you tomorrow!
~Stacie :)

Pic credit: All Rights to Everyday Minerals. I don't own the picture, I just wanted to show my inspiration! https://blogger.googleusercontent.com/img/proxy/AVvXsEjGTZkEkA1Z_FgZnuPEj4QtSY_io2uO_W07kdTiMsWONRNXHdO5_DQH6veTHRakptbEdClci6S0119NLKkM8sVwneBtbOyHseiXV4VPrgmXTboWprj8pBlpOhDFWFFxINaSIKNot1HJG4dxkVvAwOnGfgu9Bf5vwn-g-qHXmfTRDPZxKNld1jaJ0YtJe5UdvGKQFe-QtBncRrxF_30pvwYgdw=s0-d-e1-ft

Monday, March 3, 2014

Petal Pusher Challenge, Day 1: Rosy All Over


Here's Day 1's look!


These are the shades I'm working with, just to you know.

Wet n Wild 8-pan eye shadow palette in Petal Pusher

Revlon cream eye shadow quad in Seashell

Here's a little GIF I made of the tutorial thumbnails, just for fun :)


And here's the tutorial:


Okay, so that little doodle at the bottom is not my best work, but I couldn't help myself. Photoshop has been calling me back! I need to warm up my digital art skills.


The rest of the face is kept pretty clean and minimal where products are concerned. I wanted the cheeks to be pretty rosy, too, so I used my Flower Beauty blush to give me a fresh pop of color. The CoverGirl Cheeker I used as a highlight has a slight pink tone that adds to the vibe I was going for. On the lips I used a tinted lip balm I created myself, but it has a sheer pink tone similar to the blush. I'll have a  post on creating your own tinted lip balm soon. 

That pretty much wraps things up for today! I hope you have a beautiful day and I'll talk to you tomorrow :)
~Stacie

Eye Shadow Challenge: Wet n Wild Petal Pusher Palette


What's that peeking in on the picture? That's right! It's the Petal Pusher palette by Wet n Wild. I'm sure there some kind of challenge like this out there on the internet, but I don't care--I'm doing this for myself. I haven't really used this palette all that much, but I was looking at it, and I was like, "There's some gorgeous colors in here. Why am I not using this more?" So I decided I would use this palette for a week (5 days) of eye shadow looks--a different one each day. I thought it would also be fun to put my creativity to the test.

Here are my rules:

  1. The color can only come from the eye shadows (meaning no other dry shadows can add color)
  2. A base can be used, but only to make these shadows pop more. The base shouldn't change the color, so it should be in the same color family, or skin-toned/white/black.

Other than that, I'm just having fun with it! To keep things shorter and more organized, I'll put the first look in a different post. I was going to put it in this one, but that's going to get pretty long and picture-heavy pretty quickly.

Talk to you soon!
Stacie